Processing: How to Get Rid of Banding? Part 2

“I’ve got the key to my castle in the air, but whether I can unlock the door remains to be seen.”
|
This is part 2 of my articles about banding problems in Photoshop, what they are, where they come from, how to avoid them and how to mitigate or get rid of them. While I was focussing in part 1 on the understanding of the banding problem, here in part 2 I focus on coping with the problem.
One can find many different recommendations on the Internet to remove banding in photographs. In the following, I’ll summarize the different techniques and try to give recommendations when to use which techniques or combination of techniques. It is important to inspect the effect of banding at 1:1 magnification (100%). For demonstration reasons, I created a gradient that mainly works in the gray tones and is more subtle than the initially used gradient. The 8-bit image file with banding is illustrated in Image 1. I’ll create a Photoshop .psd file to download in the end of the document that contains all the different edited steps in this image. With the hope that this will help you to go through the different possibilities.

Image 1: Gradient Source File With Banding in 8-bit
Basically, all methods to get rid of banding rely on adding another artefact to the image, such as noise, blur, texture of a combination of them. It is therefore important to apply these methods locally and mask out the objects of interest.
1. Adding Noise
The idea of this technique is similar to noise-cancelling headphones, which introduces white noise into your ears in order to over-write external noise. In photography, we add noise to disrupt banding. Banding will not disappear afterwards, but it will be less visible. As noise is an artefact that is often unwanted in an image, we may want to apply it carefully and often locally to where the problem of banding is spotted.
To apply this idea, you may want to create a stamp-visible layer in Photoshop: Press Shift+Ctrl+Alt+E (Windows) or Shift+Command+Option+E (Mac). Alternatively: Hold down Alt (Windows) or Option (Mac), and choose Layer > Merge Visible. Photoshop will create a new layer containing the merged layers. Turn the stamp-visible layer into a smart object (right click on the layer -> “CONVERT TO SMART OBJECT”). This allows us to go forth and back readjusting our modifications. This layer is the starting point. Remember doing this as your last step in the editing workflow.
1a. Adding Grain Through the “Camera Raw Filter” in Photoshop or in Lightroom Directly
Go to FILTER -> CAMERA RAW FILTER, select the fx EFFECTS panel and add some grain to the image file. Although it is based on the image itself, but I often made good experiences with an amount of 20, a size of 30 and a roughness of 40 (see Image 2 for the adjustments). The same can be applied in Lightroom directly to the image.
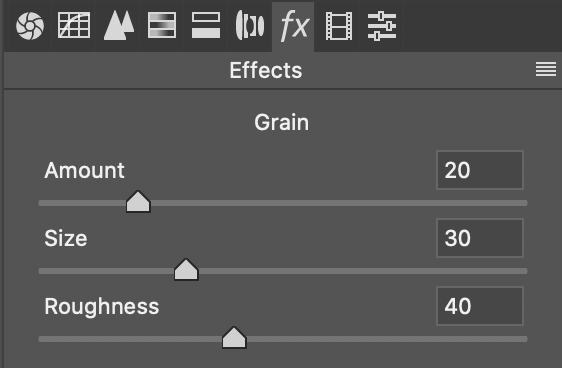
Image 2: CRF Adjustments
Image 3 shows what the result looks like.

Image 3: Gradient File With Added Grain
1b. Adding Noise Through the “Add Noise” Function
Create a 50% gray layer (holding ALT (Windows) or OPTION (Mac), select OVERLAY blending mode and click on “Fill with Overlay-neutral color (50% gray)”). Go to FILTER -> NOISE -> ADD NOISE with a pixel size of 2.1, Gauss, monochromatic (see Image 4 for adjustments). It seems that with this procedure, we have less control over the features, and often more noise is needed to get rid of banding compared to the first alternative with using grain.
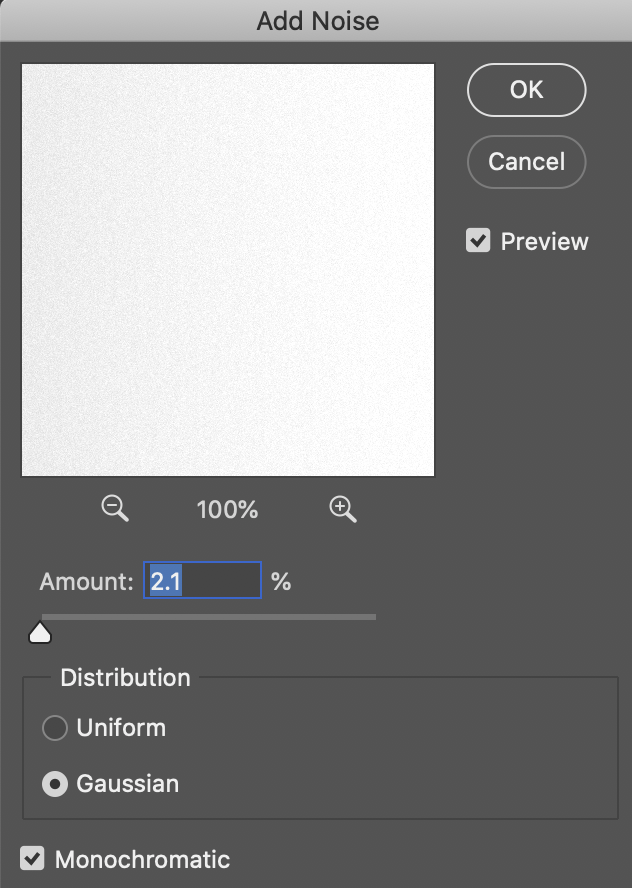
Image 4: Gradient File With Add Noise Adjustments
Image 5 shows what the result looks like.

Image 5: Gradient with Added Noise
A specialized form of adding noise is called dithering. This technique is mainly used in digital audio and video. As recommended above, in here it also marks the last step in the editing process. Whenever quantization, i.e. the mapping process from a large set of input data into a much smaller set of output data, is applied to a digital file, the output is prone to compression and information loss. This loss or quantization error is mainly caused by rounding or truncation errors of the input data. In a dithering process non-available colors in a color palette are then approximated by a certain diffusion of colored pixels from an available palette. The fewer the number of available colors, dithered images will show a higher level of characteristic graininess. For this reason, when applying a gradient to your image file, you should ensure to check Dither in the settings.
2. Adding Blur
2a. Adding Gaussian Blur
Go to FILTER -> BLUR -> GAUSSIAN BLUR.
Against the often communicated recommendation to apply a Gaussian Blur to areas showing banding, one has to say that heavy Gaussian Blur often causes banding. Adding blur doesn’t fix the banding issue for any digital outlet. Even if the banding disappears after adding Gaussian Blur to an 16-bit file, converting it into an 8-bit JPEG for the use on social media platforms, banding will reappear. What you can however do, is adding noise such as described above and then afterwards apply a Gaussian Blur to give it a realistic touch. To let the added noise look like realistic film noise and not like artificially created one, a Gaussian Blur with a 0.1 – 1.0 pixel size can be added onto the noise layer in the areas of banding.
2b. Adding Surface Blur
Go to FILTER -> BLUR -> SURFACE BLUR. Surface Blur is a specialized blur function. Blur is added to the image, but the function controls the level of detail that is spared from blurring. Thus, Surface Blur spares the blur in detailed areas.
To control this sparing, the Threshold function is used in the parameters of the Surface Blur. If the Threshold is increased to the maximum, everything in the image will be blurred. If we bring the Threshold back, larger details will be spared from the blurring. Thus, the Threshold is core and responsible for the effect being applied to the areas with the banding effect. Usually a value of 8-15 for the Threshold works well with a radius of about 40 pixels (see Image 6 for adjustments). While being carefully applied, it can still be that some object details are blurred. The objects can then easily being masked out from the blur.
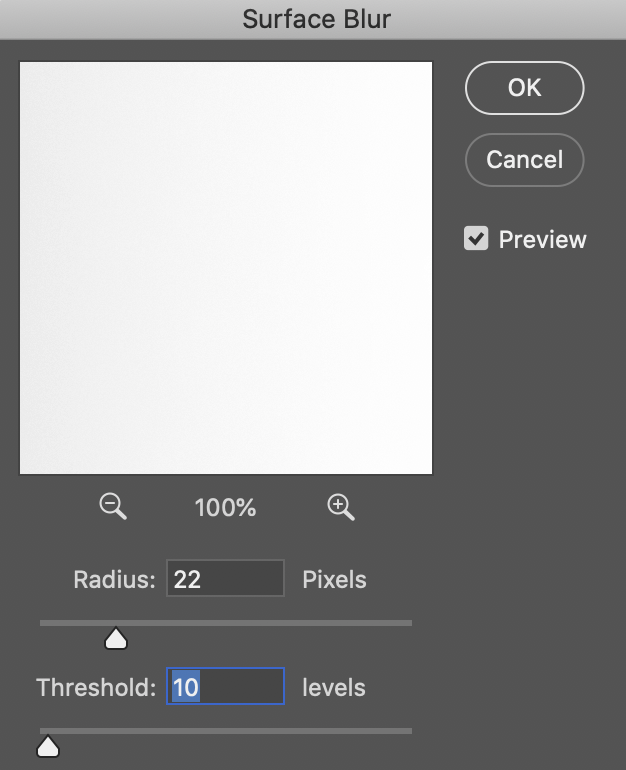
Image 6: Gradient file with Surface Blur Adjustments
If the banding is still visible in the image, this method can be combined with adding noise. Image 7 shows the results by applying this method to our gradient.

Image 7: Gradient with Added Surface Blur
PiXimperfect offers a great video demonstration and explanation of this method.
3. Adding Texture
Adding texture follows the same idea than the methods mentioned above. We are adding some artefacts to over-write the banding issue. For the purpose of demonstration, I am using a freely available texture from mercurycode.deviantart.com named “Texture Pack 2“. Out of the package, I am using the texture “wood and paint splatter texture (5)”. You can pull the texture file right on top of your Photoshop layer, adjust the size and confirm the adjustment. As the texture is a colored file, I add a black & white adjustment as a clipping mask to it. Once you applied the texture over the whole image, set it to “Overlay” blending mode and reduce its opacity to the point banding is no longer recognizable. Image 8 shows the results of applying this method.

Image 8: Gradient with Added Texture
You may want to play around with different textures to find the one best fitting your image. If the texture is too bright or too dark, you can also apply a curves adjustment layer as clipping mask to the texture layer in order to brighten or darken it without affecting the main objects in your image.
4. Using the Spatter Tool
The Spatter Technique is limited to only 8-bit images and was a recommendation to get rid of banding some years ago. For the reasons mentioned above, I do not recommend applying it. The method is hidden in Photoshop’s older Filter Gallery. It breaks up the bands with a spatter texture. Go to FILTER -> FILTER GALLERY -> BRUSH STROKES -> SPATTER. Apply a Spray Radius of about 25, and pull down the smoothness to 1.
If you are interested in this older method, I link to a video by Lee Varis demonstrating its application.
Summary
To sum it up: Banding emerges when the transition between tones are not smooth and when there is not color information available to fill-in the transitions. Banding only appears in seamless areas with similar shades of the same color. To mitigate banding, we should always work in the highest bit format possible. To get rid of banding we may add noise, blur, texture of a combination of them. It is therefore important to apply these methods locally and mask out the objects of interest. Most often, a combination of adding noise and surface blur will remove the banding issue significantly. Alternatively, adding texture leads to good results as well, when an appropriate texture is found that fits the image.
I hope you enjoyed the article and that it’ll help you to understand, avoid or get rid of any banding problem.
Sample File
Banding.psd (download)
References
- Adams, Ansel. 1948. The Negative: Exposure and Development. Ansel Adams Basic Photography Series/Book 2. Boston: New York Graphic Society.
- Adams, Ansel. 1981. The Negative. The New Ansel Adams Basic Photography Series/Book 2. ed. Robert Baker. Boston: New York Graphic Society.
- White, Minor, Richard Zakia, and Peter Lorenz. 1976. The New Zone System Manual. Dobbs Ferry, N.Y.: Morgan & Morgan.
- Image 1: Light as a Wave, in: ScratchAPixel’s course on 3D Basic Lessons, 22.12.2015.
- Dinda, Unmesh aka PiXimperfect. 2 Quick Ways to Fix Banding in Photoshop. 18.02.2020.
- Dinda, Unmesh aka PiXimperfect. Can We Really Remove Banding?. 18.02.2020.
- Varis, Lee. Remove Banding in Digital Images. 18.02.2020.
- Mercurycode. Texture Pack 02: wood and paint. 18.02.2020.